메시지 박스
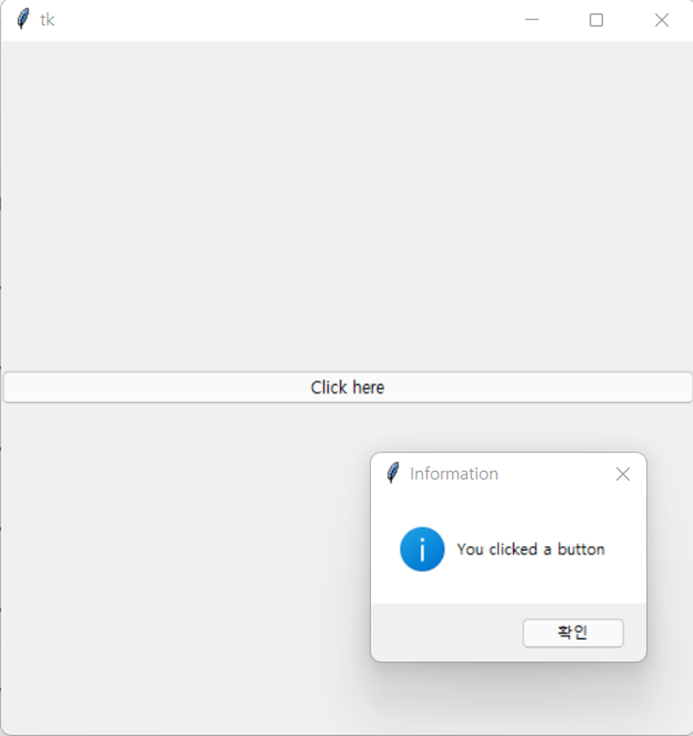
메시지 상자는 별도의 다이얼로그에 메시지를 표시하는 데 사용됩니다. 메시지 상자를 표시하려면 showinfo() 메서드를 호출하면 됩니다. 메시지 상자를 통해 표시하려는 메시지는 메시지 속성에 전달됩니다.
다음 스크립트에서는 기본 다이얼로그에 버튼 위젯을 추가합니다. 버튼을 클릭하면 메시지 상자에 버튼을 클릭했습니다.라는 메시지가 표시됩니다.
from tkinter import *
from tkinter import ttk
# importing showinfor message box
from tkinter.messagebox import showinfo
# creating instance of Tk class
main_window = Tk()
# setting window dimensions
main_window.geometry("500x500+100+200")
def my_func():
# creating a message box
showinfo(title = "Information", message = "You clicked a button")
# creating a themed button
my_button = ttk.Button(main_window, text = "Click here", command = my_func)
# attacing themed button to main window
my_button.pack(fill='x', expand=True)
# displaying the main window
main_window.mainloop()
Output:

여러위젯 추가
다이얼로그에 여러 위젯을 추가할 수도 있습니다. 과정은 간단합니다. 각 위젯 클래스에 대한 객체를 생성해야 합니다.
다음으로 위젯을 연결할 다이얼로그를 첫 번째 매개변수로 전달해야 합니다. 마지막으로 각 위젯 클래스 객체를 사용하여 pack() 메서드를 호출해야 합니다.
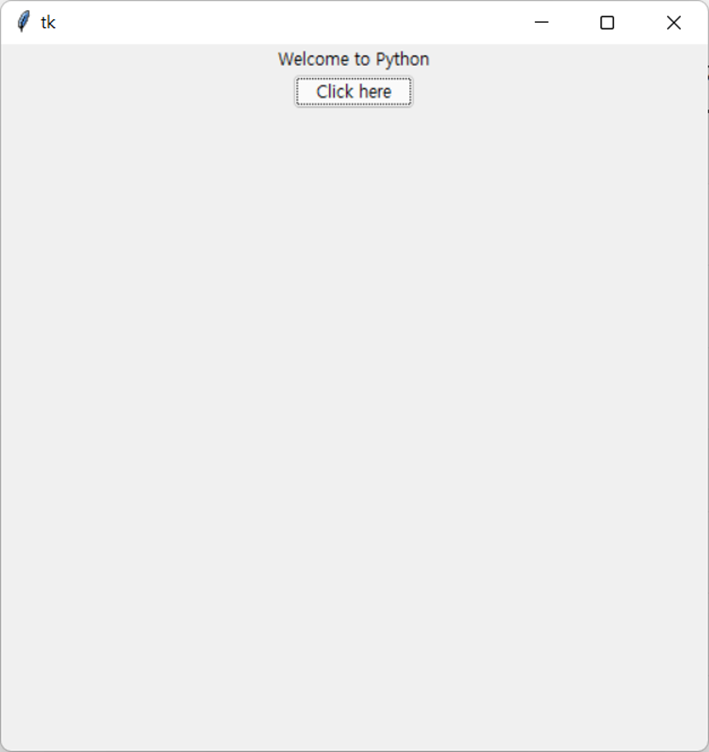
다음 스크립트에서는 기본 창에 간단한 레이블 위젯과 테마가 있는 버튼 위젯을 추가합니다. 버튼을 클릭하면 콘솔에 메시지가 표시됩니다.
from tkinter import *
from tkinter import ttk
# defining the callback function
def my_func():
print("a button is clicked")
# creating instance of Tk class
main_window = Tk()
# setting window dimensions
main_window.geometry("500x500+100+200")
# creating the default label
my_label= Label(main_window, text = "Welcome to Python")
# attaching default label to main window
my_label.pack()
# creating a themed button
my_button = ttk.Button(main_window, text ="Click here", command = my_func)
# attaching themed button to main window
my_button.pack()
main_window.mainloop()
Output:

마찬가지로 다음 스크립트는 기본 다이얼로그에 일반 레이블 위젯, 테마 레이블 위젯 및 테마 버튼을 추가합니다. 버튼을 클릭하면 콘솔에 메시지가 표시됩니다.
from tkinter import *
from tkinter import ttk
# defining the callback function
def my_func():
print("a button is clicked")
# creating instance of Tk class
main_window = Tk()
# setting window dimensions
main_window.geometry("500x500+100+200")
# creating the default label
my_label= Label(main_window, text = "Welcome to Python")
# attaching default label to main window
my_label.pack()
# creating a themed label
my_label2 = ttk.Label(main_window, text ="Welcome to Python2")
# attaching themed label to main window
my_label2.pack()
# creating a themed button
my_button = ttk.Button(main_window, text ="Click here", command = my_func)
# attaching themed button to main window
my_button.pack()
main_window.mainloop()
Output:

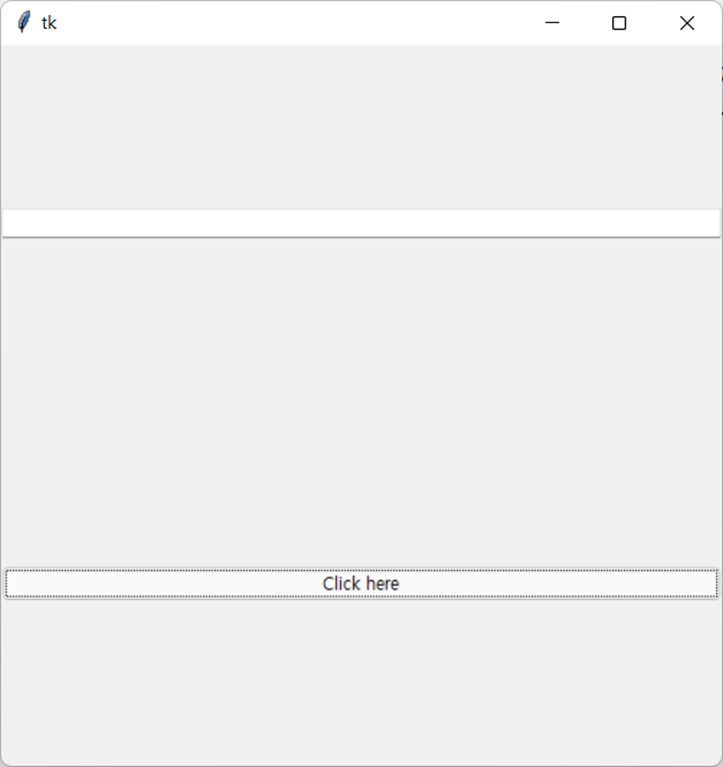
아래 스크립트는 테마 항목과 테마 버튼 위젯을 메인 창에 추가합니다. 버튼을 클릭하면 Entry 위젯에서 정의한 텍스트 필드에 입력한 텍스트가 메시지 상자에 표시됩니다.
from tkinter import *
from tkinter import ttk
# creating instance of Tk class
main_window = Tk()
# setting window dimensions
main_window.geometry("500x500+100+200")
# creating variable that contains text from the text field
my_text=StringVar()
# creating a text field using Entry class
text_field=ttk.Entry(main_window,textvariable=my_text)
# addding the text field to the main window
text_field.pack(fill='x', expand=True)
def my_func():
text = ""
if my_text.get() == "":
text = "Enter something in the text box"
else:
text = "You entered:" + my_text.get()
# creating a message box
showinfo(title = "Information", message = text)
# creating a themed button
my_button = ttk.Button(main_window, text = "Click here", command = my_func)
# attacing themed button to main window
my_button.pack(fill='x', expand=True)
# displaying the main window
main_window.mainloop()
Output:

Layout 생성
레이아웃을 사용하면 특정 방식으로 위젯을 구성할 수 있습니다.
다음 스크립트는 2개의 행과 3개의 열이 있는 그리드 레이아웃을 만듭니다.
그리드 레이아웃을 생성하려면 Tk 클래스 객체의 columnconfigure() 메서드를 통해 각 열의 위치와 너비를 정의하기만 하면 됩니다.
columnconfigure()의 첫 번째 매개변수 값은 열 위치입니다. 첫 번째 열 위치는 0이어야 합니다. 열 범위에 해당하는 가중치 매개변수 값을 지정할 수도 있습니다.
예를 들어 다음 스크립트에서는 가중치가 1인 열 세 개를 만듭니다. 열의 가중치를 2로 설정하면 해당 열의 너비는 가중치가 1인 열 너비의 두 배가 됩니다.
행에 대한 값을 지정할 필요가 없습니다. 위젯을 메인 창에 연결하면 행이 자동으로 추가됩니다. 위젯을 기본 창에 연결하려면 grid() 메서드를 호출하고 위젯을 배치할 행 및 열 인덱스의 위치를 전달해야 합니다.
행 인덱스는 위젯의 행 속성을 통해 지정됩니다.
마찬가지로 열 인덱스는 열 속성을 통해 지정됩니다. 행 및 열 인덱스는 0부터 시작합니다. 예를 들어 행 및 열 값이 0이면 위젯이 첫 번째 행과 첫 번째 열에 배치됩니다.
다음 스크립트는 기본 창에 두 개의 레이블을 추가합니다. 첫 번째 레이블은 첫 번째 행과 첫 번째 열 인덱스에 위치합니다.
두 번째 레이블은 첫 번째 행과 두 번째 열에 있습니다.
다음 스크립트는 기본 창에 두 개의 버튼도 추가합니다. 첫 번째 버튼은 첫 번째 행과 세 번째 열에 있습니다. 두 번째 버튼은 두 번째 행과 첫 번째 열에 배치됩니다. 두 번째 Button 위젯 개체, 즉 my_button2를 통해 grid() 메서드를 호출할 때 columnspan 속성에 값 3을 전달합니다. columnspan 속성은 위젯이 사용할 범위의 수를 정의합니다. columnspan이 3이면 행 및 열 인덱스에서 셀의 위치를 지정하고 해당 범위를 3개의 열로 늘립니다.
from tkinter import *
from tkinter import ttk
# creating instance of Tk class
main_window = Tk()
# setting window dimensions
main_window.geometry("500x500+100+200")
# configure the grid
main_window.columnconfigure(0, weight = 1)
main_window.columnconfigure(1, weight = 1)
main_window.columnconfigure(2, weight = 1)
# creating the default label
my_label= Label(main_window, text = "Welcome to Python")
# attaching label to first row and first column
my_label.grid(column = 0, row = 0, padx = 5, pady = 5)
# creating a themed label
my_label2 = ttk.Label(main_window, text = "Welcome to Python2")
# attaching label to first row and second column
my_label2.grid(column = 1, row = 0, padx = 5, pady = 5)
# creating a themed button
my_button = ttk.Button(main_window, text ="Click here")
# attaching a button to first row and third column
my_button.grid(column = 2, row = 0, padx = 5, pady = 5)
# creating a themed button
my_button2 = ttk.Button(main_window, text ="This button spans three columns and will be centered horizontally")
# attaching a button to first row and third column
my_button2.grid(column = 0, row = 1, columnspan = 3, padx = 5, pady = 5)
main_window.mainloop()
Output:

'프로그래밍 언어 > 파이썬 (Python)' 카테고리의 다른 글
| [파이썬 학습] GUI 생성 - 1 (0) | 2022.02.28 |
|---|---|
| [파이썬 학습] 스레드 간 통신 (0) | 2022.02.27 |
| [파이썬 학습] 스레드 동기화 (0) | 2022.02.26 |
| [파이썬 학습] 멀티 스레딩 (0) | 2022.02.25 |
| [파이썬 학습] 사용자 모듈 (0) | 2022.02.23 |